
Before installing a smart thermostat, understand its components like Wi-Fi connectivity and sensors for optimal energy efficiency. Gather compatible tools and ensure HVAC system compatibility. Set up the thermostat by mounting, connecting to Wi-Fi, and customizing settings. Program and connect it to your home network for remote control via apps. Seek professional help in Bromsgrove if issues arise during installation.
Looking to upgrade your home’s efficiency? Installing a smart thermostat yourself is an easy, cost-effective way to start. This guide breaks down the process step-by-step. From understanding your new smart thermostat and its components, to gathering necessary tools and ensuring compatibility with your existing system, you’ll learn everything needed for successful DIY installation. We’ll walk through unboxing, setting up, wiring, and programming your new smart thermostat efficiently.
- Understanding Your Smart Thermostat and Its Components
- Preparation: Gathering Tools and Ensuring Compatibility
- Unboxing and Setting Up the Thermostat
- Wiring and Programming Your New Smart Thermostat
Understanding Your Smart Thermostat and Its Components
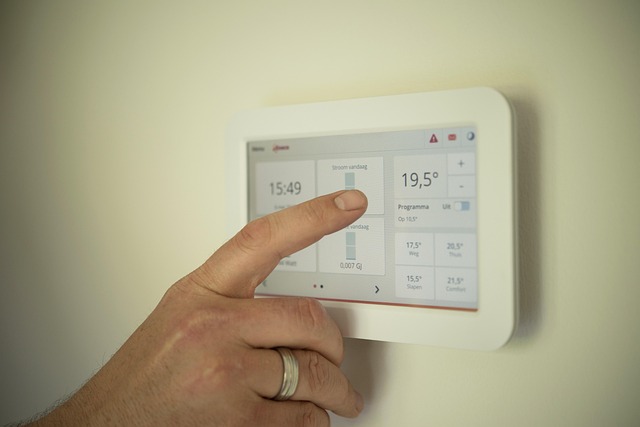
Before installing your new smart thermostat, take a moment to understand its various components and how they work together. Unlike traditional thermostats, smart models are equipped with Wi-Fi connectivity, allowing you to control temperature settings remotely via a mobile app or voice assistant. They often feature advanced sensors that detect occupancy and room temperature, automatically adjusting settings for energy efficiency.
Understanding the setup process is key to ensuring optimal performance. Follow the best practices for smart thermostat setup, such as placing it in a central location away from direct sunlight or vents. Resolving smart temperature control issues at home can be straightforward if you familiarize yourself with these components and proper installation techniques. A successful installation will enable you to take full advantage of the advanced features and benefits of your new smart temperature control system.
Preparation: Gathering Tools and Ensuring Compatibility

Before you begin installing your new smart thermostat, it’s crucial to prepare by gathering all necessary tools and ensuring compatibility with your existing HVAC system. Start by checking your owner’s manual or manufacturer’s website for a list of compatible devices and required tools. You’ll likely need basic tools like a screwdriver, measuring tape, and a level—items commonly found in any home toolbox. Additionally, ensure internet connectivity, as most modern smart thermostats require Wi-Fi to function properly.
Compatibility is key when it comes to smart thermostat installation. Verify that your HVAC system is compatible with the specific model you’ve chosen, considering factors like heat pump or furnace type and wiring configurations. Many manufacturers offer compatibility checkers on their websites, making it easy to determine if a thermostat will work seamlessly with your current setup. When in doubt, consult a professional for guidance, especially if you’re unsure about any aspects of the installation process.
Unboxing and Setting Up the Thermostat
Unboxing your new smart thermostat is an exciting step towards enhancing your home’s comfort and efficiency. Begin by carefully removing all components from the box, ensuring you have every part needed for installation. Most smart thermostats come with a detailed user manual, so refer to it as you set up your device. Start by mounting the thermostat on a wall in your main living area; this central location ensures optimal temperature control. Follow the manufacturer’s instructions, which typically involve securing the base plate and attaching the sensor unit. Ensure proper placement for accurate readings, usually near windows or doors.
Once mounted, connect the thermostat to your Wi-Fi network using the provided instructions. This step is crucial for remote access and programming through dedicated apps. After successful connection, you can begin customizing your settings, such as setting a welcome temperature and scheduling preferences. With a local smart home setup specialist’s guidance or by following online tutorials, the process becomes manageable. Remember, while installing a smart thermostat yourself offers cost savings, understanding how much it costs to install one can help you decide if DIY is the right choice for your budget.
Wiring and Programming Your New Smart Thermostat

After successfully installing your new smart thermostat, it’s time to harness its full potential by wiring and programming it correctly. Start by ensuring your device is connected to your home network via Wi-Fi or Bluetooth, depending on the model. This enables you to control it remotely through a compatible app.
Next, familiarize yourself with the thermostat’s interface and settings. Most smart thermostats offer customizable temperature schedules, allowing you to set different temperatures for various times of the day. You can also connect it to other smart home devices for comprehensive control. Should your thermostat not connect or encounter any issues, consult the manufacturer’s guidelines or consider seeking assistance from a professional plumber in Bromsgrove.
Installing a smart thermostat yourself is an achievable task with the right preparation. By understanding your device, gathering necessary tools, and following the step-by-step setup process outlined in this guide, you’ll soon enjoy the benefits of energy efficiency and personalized temperature control. With just a few simple adjustments, you’ll be well on your way to a smarter home environment. So, take control of your indoor climate and embark on the journey to a more sustainable future—one smart thermostat at a time!