
Understanding smart thermostat basics is key. Inspect and install the device using provided instructions, mounting it centrally for optimal temperature control. Connect to Wi-Fi for remote access via smartphone or tablet. Download and set up the associated app for customization options, energy monitoring, and smart grid integration.
“New to smart home technology? This comprehensive guide will walk you through setting up your first smart thermostat, from unboxing to optimization. We’ll break down the process step-by-step, ensuring a smooth transition to energy-efficient living. Learn how to identify and connect your components, mount the device securely, and link it to your Wi-Fi network. Plus, discover top-rated apps for control and customization. Embrace the future of home comfort with our easy smart thermostat installation guide.”
- Understanding Your Smart Thermostat
- Unboxing and Familiarizing Yourself with Components
- Mounting the Thermostat on Your Wall
- Connecting to Wi-Fi Network
- Downloading and Setting Up Associated App
Understanding Your Smart Thermostat
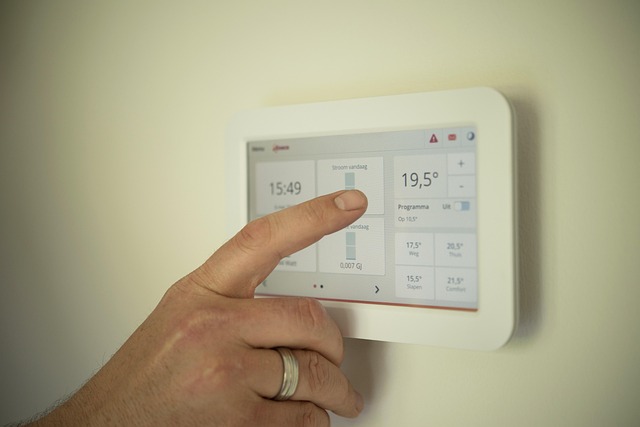
Understanding Your Smart Thermostat is a crucial first step in any smart thermostat setup guide, especially for beginners. Unlike traditional models, smart thermostats offer advanced features and connectivity, allowing you to control temperature from anywhere using your smartphone or voice assistants. They learn your habits and automatically adjust settings to save energy and reduce bills. Key components include a display showing current temperature and settings, sensors to detect occupancy, and Wi-Fi or Bluetooth connectivity for remote access.
When considering smart thermostat installation, whether in a rental property or your own home, remember that these devices integrate seamlessly with the internet of things (IoT). This means you can connect them to other smart devices for comprehensive control over your living space. In terms of benefits, a smart grid and smart thermostats work together to optimize energy usage, reducing both environmental impact and utility costs.
Unboxing and Familiarizing Yourself with Components
Upon unboxing your new smart thermostat, take a moment to familiarize yourself with its components. Inside, you’ll typically find the main unit, which houses the control panel and display, along with a temperature sensor and mounting hardware. Also included may be a wall mount, a set of instructions, and possibly an adapter for connecting to your home’s electrical system. Carefully inspect each piece to understand their roles in the setup process.
Before installing your smart thermostat, it’s crucial to ensure compatibility with your heating, ventilation, and air conditioning (HVAC) system. Check your system’s specifications and compare them against the thermostat’s requirements. Once ready, follow the step-by-step instructions provided by the manufacturer, which will guide you through the installation process, including how to synergize the smart thermostat with other IoT devices for enhanced home automation capabilities or choose from affordable smart home automation options available in the market.
Mounting the Thermostat on Your Wall

Mounting your new smart thermostat on the wall is a straightforward process and can be accomplished without calling in a professional. The first step involves choosing the right location—ideally, a spot near the central control points of your home, like a hallway or landing, as this ensures even temperature distribution throughout your space. Once you’ve selected the ideal place, simply remove the protective backing from the adhesive strip on the back of the thermostat and press it firmly onto your chosen wall. It’s crucial to ensure the surface is clean, dry, and free from obstructions for optimal adhesion.
If your existing wall has a traditional thermostat mounted, replacing it with a smart model is as easy as unscrewing the old one and securing the new one in its place using the provided hardware. Consult your thermostat’s manual if you’re unsure about any step during the wireless thermostat installation guide. With a bit of patience, you’ll have your smart thermostat up and running in no time, allowing you to control your home’s temperature effortlessly from your smartphone or voice assistant.
Connecting to Wi-Fi Network
Connecting your smart thermostat to your Wi-Fi network is a crucial step in achieving efficient smart temperature control at home. Begin by ensuring your device is powered on and within range of your wireless network. Most modern routers offer excellent coverage, so place the thermostat in a central location for optimal connectivity. Look for the network settings on your thermostat’s display and select your Wi-Fi network from the available options. You may be prompted to enter a password; simply input your router’s secure connection details. Once connected, you’ll likely need to pair the device with the corresponding mobile app, providing an easy wireless thermostat installation guide for beginners.
This seamless integration enables users to resolve smart temperature control issues at home remotely via their smartphone or tablet. By leveraging the smart grid and smart thermostats, homeowners can optimize energy usage, reduce utility bills, and contribute to a more sustainable future.
Downloading and Setting Up Associated App

Downloading and setting up the associated app is a crucial step in your smart thermostat installation journey. Most reputable brands offer user-friendly apps that allow you to control your new smart device from the comfort of your smartphone or tablet. Start by downloading the app specific to your model from the App Store (iOS) or Google Play Store (Android). Once downloaded, follow the on-screen instructions to create an account and pair your thermostat with your home Wi-Fi network. This process is often straightforward and guided by simple tutorials within the app itself.
With the app connected to your smart thermostat, you can begin customizing your temperature settings, scheduling preferences, and even monitoring energy usage. Many apps provide real-time data and insights, helping you make informed decisions about your heating and cooling systems. This do-it-yourself approach not only simplifies the smart grid and smart thermostats integration but also empowers you to take control of your home’s energy efficiency, ensuring optimal comfort at all times.
Setting up a smart thermostat is an easy process that can significantly improve your home’s energy efficiency. By following this step-by-step guide, from understanding your new device to downloading the associated app, you’re well on your way to smarter heating and cooling control. With just a few simple connections and adjustments, your smart thermostat will soon be learning your preferences and optimizing your comfort while saving you money. Happy installing!